Teach yourself how to build a plastic bottle house with cob and transform trash into a home.
I build houses out of trash. I was inspired by the life of Kenyan Nobel laureate Wangarĩ Maathai, who said, “It’s the little things citizens do. That’s what will make the difference. My little thing is planting trees.”
As an American living in Kenya for more than 40 years, I’ve often been inspired by the lives of hardworking African women. Maathai inspired us all to look within, to see what gift we could bring to make the world a better place. Her “little thing,” planting trees, birthed the Green Belt Movement, which has spread its branches throughout the world. My little thing is to make buildings out of garbage and mud.
Creativity is often birthed through the process of trying to solve a problem. When I moved to rural Kenya, my problem was what to do with an ever-growing pile of trash. Unlike at my former home, we had no trash collection or recycling services. My two options were to build a pit to bury the trash or to burn it. All of our neighbors did both. However, as one of the founders of Eden Thriving, a group that provides environmental stewardship training in local Kenyan schools, I felt there must be a better way.
When my family moved to the bush, we began to carve out a place to live, building a home and campsite. I’d just completed building a cob “outhouse” with the men who staffed our little farm, by combining information from cob-building books with the mud-building of Eden Thriving’s local Kenyan staff. I wondered if I could solve the problem of trash overload with some of the natural-building techniques I’d just gleaned. A dear friend of mine had shared how, years before, her dad had built a mud-and-wattle type of house, and he had put large stones between stick latticework before mudding. Why couldn’t I substitute non-decomposable trash in the walls instead of rocks?
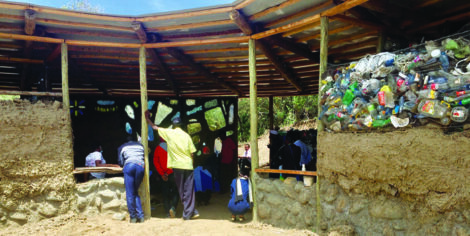
I came up with the idea of placing eucalyptus poles every few yards around the circumference of the building and then nailing chicken wire on both sides of the poles to make large “pockets” in which to stuff the trash. I’d use a typical cob-mud mixture to plaster the walls. We started off very simply, trying my idea on a small storeroom. With some adjustments, we found that it worked! Most natural buildings made of mud and branches are the work of women in Kenya. My work was inspired by this long history of African women building homes for their families.
Over the years, we’ve built quite a few buildings using this technique. We started small, and as we grew in confidence, we tried out more ideas. We’d meet in the morning and share designs. Sometimes these worked and sometimes not, but we all loved the creativity and artistic talents that flourished as we tried new concepts.
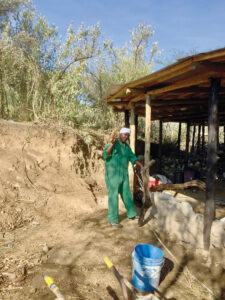
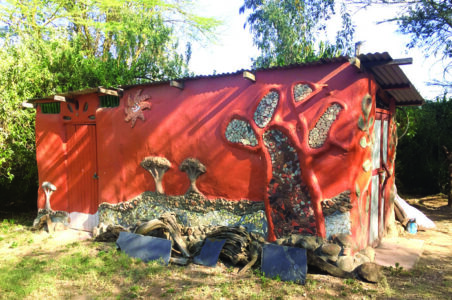
This experience inspired me to someday make my own mud house – and my dream came true during the COVID-19 shutdowns. Many people were out of work in Kenya at that time, as tourism collapsed and other industries shrank. I felt it was time to make my dream a reality, so I rehired some previous staff members to make a two-bedroom guest house. Up to that point, we’d made only a couple of storerooms, a riverside kitchen, and a meeting room. Why not a home; a place for gathering, community, beauty, and love-sharing?
We put together a small team of workers and set to work using the mud-building skills we’d learned on our other buildings. I sketched a rough plan, and we gathered garbage, river rocks, eucalyptus poles, chicken wire, bottles, and more. We installed the stem wall with a good foundation, inserted the upright poles, and began to build. Slowly, the house took shape as we added more windows and doors and plastered the walls.
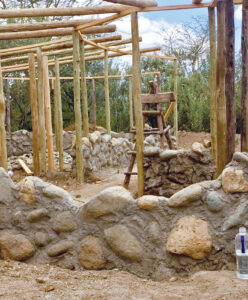
We started work on our home by collecting river rocks from a nearby river to make a stem wall. It’s important when building a mud building to make sure it has a good “hat” (sufficient overhang of the roof) and good “boots” (a stem wall) to prevent rain from splashing onto the mud walls. As we placed the rocks, we also cemented into the walls local eucalyptus poles that were treated to prevent bug infestation. We placed them every few yards along the circumference of the structure.
Next, we attached swaths of chicken wire on either side of the poles to create a “pocket” to place our hand-crushed items, such as plastic jars and bottles, tin cans, VHS tapes, glass bottles, and even – to the frustration of my grown sons – the first Nintendo game ever created! When they got tired of placing the trash, the guys would wander down to the river to look for smaller rocks, branches, and driftwood to incorporate into the walls. Friends dropped off interesting glass bottles.
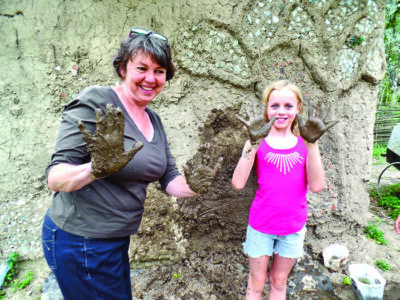
The next step was to mix and apply the cob-plastering mixture using clay, sand, and mud.
The first time I mudded a building was one of the best experiences of my life. We’d been invited by a local church community to help them mud their church. We took off our shoes, jumped into the mud to mix it with our toes, and then took turns throwing the mud at the stick latticework walls. We had to time our slinging just right; otherwise, we might be standing up with a clump of mud just as someone was hurling from behind us! We also needed to make sure no one was standing on the other side of the wall when slinging it. I loved how the whole community came together for a day of creating, singing, laughing, and eating.
We were lucky to have the right composition of soil to make a cob mixture for the walls. Mixing the mud with bales of straw gave tensile strength to the plaster.
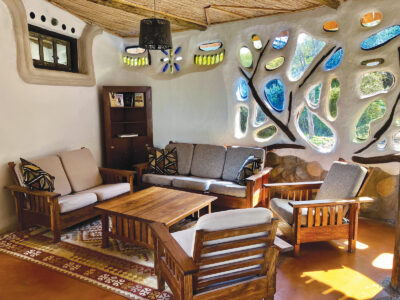
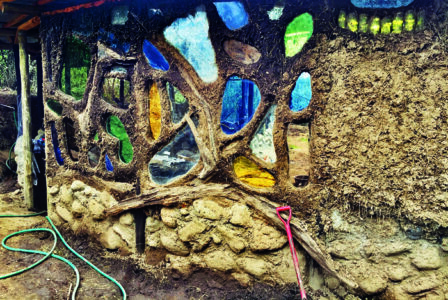
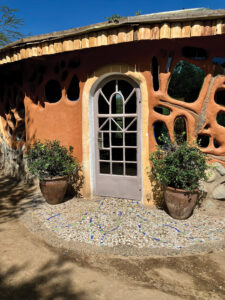
We found a treasure of broken glass that the owners of a local glass store couldn’t sell. We slid the glass pieces into the walls and mudded around the edges, making them look like rounded windows. We learned a few things about selecting glass, because as the soil became hard like clay and the house “settled,” cracks appeared in the thinner windowpanes. We called a friend, who painted tiny branches over the cracks with local birds sitting atop those branches. Mistakes often give rise to more creativity!
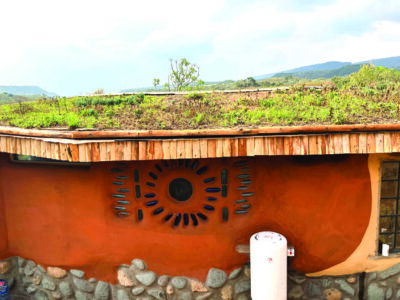
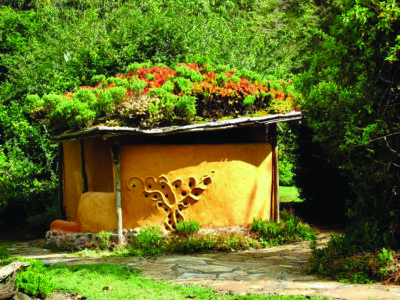
Finally, we added the roof. One of the most serious problems we encountered was that the living roof was heavier than we’d anticipated, and it looked as if it would cave in over the main bedroom. We’d made living roofs in the past by laying down plastic sheets and spreading 1 to 2 inches of soil on the top before planting succulents. When I questioned why it was so heavy, I found that someone had misunderstood me and put a foot of soil on the roof! So, we spent a few days removing all the soil, and then we mixed the soil with a small amount of light pumice gravel before replanting.
We all became adept at fitting natural things into the house. The construction foreman, Baba Nduta, chose gnarled driftwood from the river to make window frames. One day, I found a hollowed-out euphorbia tree trunk riddled with insect holes. It became a decorative beam in the house, from which to hang upcycled glass-bottle lights.
Building with trash and mud is a slow process. We worked together for two years to create our final masterpiece. Through it all, we grew together, at a time when the world seemed divided and fragmented.
The beauty of Africa is in community, and, today, as I look at our “little thing,” I’m reminded of everything I love about living in this wild and beautiful place we call home.
We call our lovely two-bedroom cottage Mabaki, Swahili for “leftover.”
How We Built Our Cob House with Trash and Mud
- We began by collecting trash in gunnysacks.
- We then placed a rock stem wall around the diameter of the building and positioned eucalyptus poles every few meters within the rock.
- Next, we made the chicken-wire pockets and began the process of stuffing the walls with trash.
- We learned that it was important to thread binding wire every so often between the two outer frames of chicken wire. As we filled the wall with trash, we used the binding wire to pull the chicken-wire frames tight to keep the walls from bulging outward.
- When the wall was full, we began the process of making the cob-plastering mixture. We had plenty of subsoil on our property with the right ratio of clay and sand, so we mixed it with straw.
- Sometimes, we added colored bottles or driftwood to the walls by cutting out areas of chicken wire as we moved up the wall, plastering as we went.
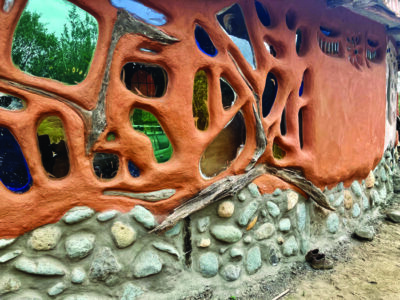
- We usually put on about three layers of mud plaster. We made sure the last layer was mortared with lime so the outer wall wouldn’t wash away in the rain.
- For color, we mixed combinations of yellow and red oxide powder to the final coat of plaster.
- On several of our buildings, we created a living roof filled with succulents for beauty.
- We added a simple cement floor and finished the house in the same way you would a cob building: with organic artistry – creating the effect we were looking for.
Kym Arensen grew up in Tacoma, Washington, and moved to Kenya with her family over 40 years ago. Her life is full of educating children with learning challenges, organic gardening, and raising myriad dogs, cats, chickens, rabbits, and dairy goats with her husband.


